 --- It never hurts to help!?
--- It never hurts to help!?
Update 2012: Better yet download, install and enjoy Xming!
First of all it would be best, if not required ![]() , to visit the official X/Cygwin site to learn a little of other people's efforts to...ahm here the opinions are divided but they vary from - waste their time and knowledge to port some open source, buggy code to MS-Windows - to - improve this growing commercial software that Windows is. Anyway, the important thing is that you wouldn't be here if you don't need it, so better not forget to download the setup.exe file that drives the whole installation process. Now, once downloaded, the setup.exe must be run (yet for the paranoid users out there it won't hurt to check for viruses with you favorite antivirus program - just in case you find it infected please let the Cygwin developers know that they really got on the blacklist
, to visit the official X/Cygwin site to learn a little of other people's efforts to...ahm here the opinions are divided but they vary from - waste their time and knowledge to port some open source, buggy code to MS-Windows - to - improve this growing commercial software that Windows is. Anyway, the important thing is that you wouldn't be here if you don't need it, so better not forget to download the setup.exe file that drives the whole installation process. Now, once downloaded, the setup.exe must be run (yet for the paranoid users out there it won't hurt to check for viruses with you favorite antivirus program - just in case you find it infected please let the Cygwin developers know that they really got on the blacklist ![]() ).
).
From here on, there are some steps that you must complete (mostly check that the default options are selected and press Next) so we'll pass swiftly over to the really interesting configuration part. Make sure that the Install from Internet option is checked on the Choose a Download Source screen, that you install the software for All Users (let's not be selfish), that the Default Text File Type remains set on Unix and of course that you use a directory where your administrator, boss, parents, bigger brothers or sisters or any potentially threatful (if you ruin their systems) relatives let you install things, as the Root Directory. The Local Package Directory customizable on the next screen should be set under the same directory leaf as Root Directory, mainly to prevent any repercussions from the persons enumerated earlier, ahm, so it's your decision what path to give as long as it is a valid one. Next, the connection type should remain Direct Connection unless some computer geek (you keep as your pet around you) tells you not to and instructs you what other option to select - of course there always remains the trial and error method combined with some backtracking though in most cases an error could mean restarting the installation process from the beginning. Fortunately before allowing you to Choose a Download Site the program must download a list of these sites so the confirmation of a right selection at the previous step comes quickly. And from here on the fun starts!
Now, a sign that you're on the right way is having the following screen in front of your eyes

In the rare cases when you don't see this screen or anything else which must be highly similar, you are encouraged to keep repeating the procedure from the start until you do, otherwise there is no use to continue reading ![]() . As it says this screen allows the user to select a download location as well as entering a custom download location to speed up the installation process. Here you can use our repository residing on theory.nipne.ro but for that you should ask the author of this page for the exact URL.
. As it says this screen allows the user to select a download location as well as entering a custom download location to speed up the installation process. Here you can use our repository residing on theory.nipne.ro but for that you should ask the author of this page for the exact URL.
After downloading a list of packages you should get the following screen
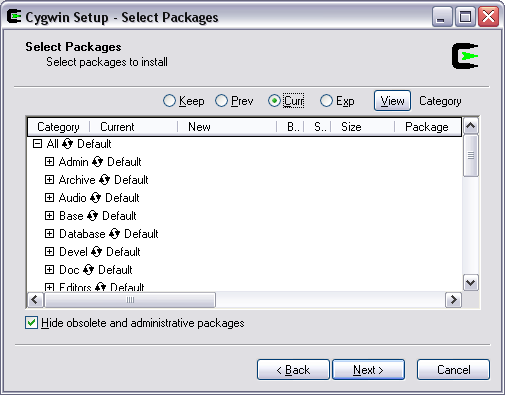
I'll write a few words on how to minimize the amount of disk space necessary to install a working X server. The purpose of this small guide is after all to setup a Windows box capable of functioning as an X server and use it a remote display for your SSH session on a Linux/Unix machine!
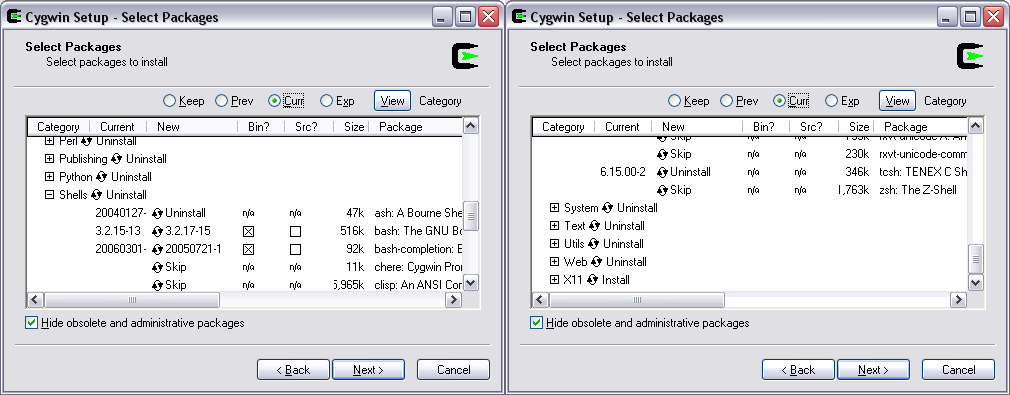
So, you'll have to double-click the ![]() symbol next to the All until the configuration changes to Uninstall. Thus, at this point no package should be set for install! Next, you should choose to install the binaries of bash and bash-completition packages from Shell category and select the Install action for the whole X11 category. It is a matter of taste but I like to have the OpenSSH (which can be found in the Net category) as well as the sometimes useful Midnight Commander (mc) (from Editors category) installed. You can use OpenSSH to make SSH connections to Linux machines instead of using some other utility as PuTTY while Midnight Commander is a handy file system browsing tool. Anyway if you have extremely limited free disk space these two packages are the first ones that need be omitted. In any case eliminating the BASH package is not recommended since we'll use the shell a little bit later to authorize the remote machine to use our Windows based X server. So the minimum required packages should be marked for installation as presented below
symbol next to the All until the configuration changes to Uninstall. Thus, at this point no package should be set for install! Next, you should choose to install the binaries of bash and bash-completition packages from Shell category and select the Install action for the whole X11 category. It is a matter of taste but I like to have the OpenSSH (which can be found in the Net category) as well as the sometimes useful Midnight Commander (mc) (from Editors category) installed. You can use OpenSSH to make SSH connections to Linux machines instead of using some other utility as PuTTY while Midnight Commander is a handy file system browsing tool. Anyway if you have extremely limited free disk space these two packages are the first ones that need be omitted. In any case eliminating the BASH package is not recommended since we'll use the shell a little bit later to authorize the remote machine to use our Windows based X server. So the minimum required packages should be marked for installation as presented below
When proceeding to install the selected packages you may be asked to select some more packages so as not to break some dependences. Of course you must answer positively to such questions! Well, from here on the actual installation of the X/Cygwin packages should run smoothly so I'll write in the followings a few words about the post-installation configuration required to make the server accept connection from remote hosts.
I'll presume one will request the X forwarding to our Windows box for just one remote host therefore only one display will be active at any time. If your Windows version is XP and later and/or you are using a firewall you should allow connections remote hosts on the 6000 port (TCP & UDP) and for XP-SP2 and later you're encouraged to actually change scope of the firewall rule as to restrict connections only to the IPs of the hosts you'll work with.
After starting the X server it should open a shell window on the screen and the ![]() icon should appear in the SysTray indicating that the server has display 0:0 open. Now, there is a command one should issue just before making a connection to a remote host that instructs the X-server to accept connections from that IP:
icon should appear in the SysTray indicating that the server has display 0:0 open. Now, there is a command one should issue just before making a connection to a remote host that instructs the X-server to accept connections from that IP:
xhost +<xxx.xxx.xxx.xxx - remote host's IP>
I prefer to type this command each time I connect to a remote host because I find it difficult at this moment to modify the X-server configuration files accordingly. But who knows maybe some day I'll take the time to investigate how to automate this authorization process! ![]()
Once logged on the remote machine using either OpenSSH
ssh <username>@<hostname/host IP> -X
or using PuTTY and specifying X-forwarding enabled, you should set the DISPLAY environment variable to the value specifying your remote display:
BASH: export DISPLAY=<your Windows machine IP>:0.0
CSH: setenv DISPLAY <your Windows machine IP>:0.0
depending on the shell the remote host provides you at logon.
Well, this should be it! Of course most if not all of the Linux/Unix commands in the last part could be avoided by modifying the X-server and ssh client program settings but this variant of actually issuing the commands was preferred as it makes the procedure configuration independent. For all those out there ready to throw flames and comments please take into account that the present guide isn't optimized but just instructs the basic Windows user on how to quickly setup and use the X-forwarding feature of a SSH session! ![]()